3Dnot2D shares a comprehensive Blender tutorial on creating an ancient architecture scene, emphasizing efficient techniques, realistic detailing, and environment design, complete with free assets and add-on recommendations.
In this detailed tutorial, 3Dnot2D guides viewers through the process of creating a stunning ancient architecture scene in Blender. The video focuses on efficiency, realism, and utilizing specialized tools and add-ons to achieve a high-quality result. Let’s dive into the key techniques and resources shared in this tutorial.
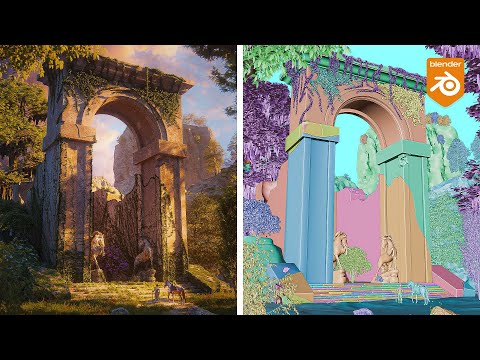
Architectural Modeling Techniques
3Dnot2D begins by emphasizing the importance of establishing a sense of scale early in the modeling process. A “base mesh superhero base mesh” figure, approximately 180 cm tall, is used to visually gauge the dimensions of architectural elements. For example, a basic cube is set to 4×4 meters, allowing for accurate scaling of pillars and other structures. As 3Dnot2D notes, “The reason I using this is just for the sense of the scale because now if I put a cube here the cube is 2 m by 2 m… So I have a nice sense of how big this cube is.”
A modular approach is adopted, building the scene from “whole parts combined and also separated parts,” allowing for flexibility and reuse of components. Basic techniques like extrusion and loop cuts are used to create complex architectural forms from simple shapes, such as creating a pillar. The mirror modifier, with an “empty” object as the mirror origin, streamlines the modeling of symmetrical structures.
The spin tool is highlighted as the “easiest way” to create perfect arches. By positioning the 3D cursor and using precise rotation increments, an arch can be formed. Refinement involves extruding and using the “S Z 0” technique with the 3D cursor as the pivot point to flatten polygons for a clean arch bottom.
Adding Realism Through Damage and Detail
To create realistic damage on walls, a non-destructive method using the “Bull Tool” (a Blender default add-on) is employed. A basic wall is created from a cube, and a separate cube is heavily subdivided. A “displace modifier” with a “clouds” texture is applied to the second cube to create an irregular, rocky shape. This “rock” object is then used with the Bull Tool (Ctrl-minus) to cut out damage from the wall. This allows for rotation and scaling of the damage.
Specialized add-ons are used for more intricate damage. The One Click Damage (OCD Plugin) is used for adding “damages” to objects like stairs, offering “a lot of options how the damage will look,” including material application for inside and outside parts. The Cracker add-on (Ctrl+W) is utilized for detailed cracks on pillars and other surfaces, allowing for manipulation of crack size, rotation, and displacement, creating “two separated parts” for a realistic break.
Environment Creation
An “image plane with the clouds” serves as the sky, providing a realistic backdrop. Pre-made “models from Mega Scans” are incorporated for realistic rock formations, indicating the use of external asset libraries for efficiency. The “Arborea” add-on by Sweeper3D is central to creating the natural elements, including “grass trees bushes and so forth.” It boasts “600 plus assets” and “scatter is implemented,” eliminating the need for additional scattering tools. According to Sweeper3D’s Gumroad page, Arborea is designed to populate scenes with realistic vegetation quickly and efficiently.
Weight painting is used to define areas where grass and other vegetation should not grow, effectively creating “the road part.” Blender’s built-in “landscape add-on” is used to generate the terrain. The creator utilizes “presets,” specifically “large terrain,” and then scales and copies it with different options. The ability to “play with these tools” and “set the random seed” allows for varied terrains.
Lighting and Atmosphere
The scene’s lighting relies on a “sun” light and “two area lights.” An “HDRI” (High Dynamic Range Image) from Polyhaven.com is also used, set to a strength of one. A separate “plane” with an “emission shader” provides a custom sky, offering control over its brightness (strength of two). The two area lights are strategically placed to illuminate specific architectural elements and models, with their “spread” narrowed to create focused beams.
A “gobo” is used with one of the area lights to “narrowing down like you’re put it through some trees or leaves,” adding a naturalistic light pattern. The lighting’s color temperature is crucial for the scene’s mood. The “sun” and two area lights are intentionally set to “2,000 Kelvin,” creating a “really really warm” and “orangey” light, matching a “sun that is setting down.” To counteract the excessive warmth, the overall scene’s “white balance” is set to “4,000,” making “everything a little bit cooler.”
Volumetric fog is added using a large “cube” named “volume,” encompassing the entire scene and set to a “principal volume” shader with a “bluish” color and very low “density” (0.001). This subtly adds “softness and atmosphere to the scene,” described as a “tiny touch tiny spice.”
Free Assets and Resources
3Dnot2D provides access to free assets used in the tutorial via their Patreon page. These assets can be a great starting point for your own projects.
In conclusion, 3Dnot2D’s tutorial offers a wealth of knowledge for creating stunning ancient architecture scenes in Blender. By combining fundamental modeling techniques with powerful add-ons and meticulous attention to detail, artists can achieve impressive results.
Source:
3Dnot2D – How I made Ancient Architecture scene in Blender + free assets


