Dive into the intricate process of creating a detailed underground factory render in Blender. This guide covers modeling, texturing, lighting, and composition, with valuable insights from CG artist Max Hay.
Creating immersive and atmospheric environments in Blender can be a rewarding challenge, especially when aiming for a specific mood like a gritty, forgotten underground factory. Many artists find themselves grappling with how to bring their visions to life, from initial blocking to the final render. Thankfully, talented creators like Max Hay are here to demystify the process, offering comprehensive guides that illuminate complex workflows.
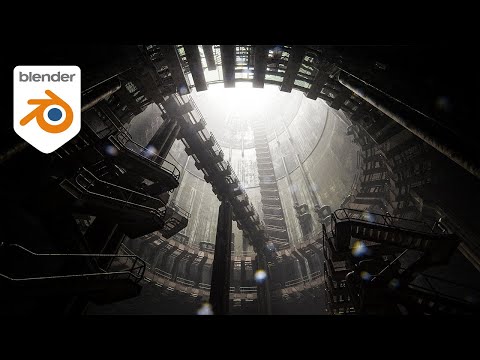
In his insightful video, professional CG artist Max Hay walks viewers through the entire journey of crafting a detailed underground factory scene. He begins with fundamental blocking techniques and progresses through intricate modeling, realistic texturing, evocative lighting, and crucial final composition adjustments. His goal was to evoke the feeling of an old factory, silo, or even a flood tunnel within a massive cylindrical structure, all captured with a dramatic upward-looking camera angle. Max, known for his dedication to sharing knowledge and high-quality assets with the community, even provides a free blend file of this very project, along with other free models, making it incredibly accessible for aspiring artists to follow along.
Building the Foundation: Modeling Custom Structures
The initial phase of any complex scene involves careful blocking. For this underground environment, Max started with a large cylinder to define the primary space, which would eventually house multiple levels of stairs and platforms. A core modeling challenge was creating custom curved stairs. He skillfully utilized a cylinder as a base, applying Blender’s spin tool to achieve the desired curvature, then employed a mirror modifier to complete the structure. Strategic loop cuts were added, faces dissolved, and the shear tool was crucial for maintaining consistent thickness. To refine the edges, beveling was applied, and the Alt+S shortcut proved invaluable for adjusting overall thickness. Vertical pillars were integrated, and a section was cleverly separated and flattened to form an adjacent platform. To ensure seamless connections, the bottom vertices of the stairs were carefully lowered. Finally, an array modifier was deployed to efficiently duplicate the stair sections along the Z-axis, perfectly fitting them within the cylindrical structure.
Adding Grime and Detail: Texturing and Materials
Once the foundational modeling was complete, attention shifted to texturing. For the outer covering of the platforms, faces were duplicated, extruded, and beveled to add depth. The Alt+D function was a game-changer here, creating linked duplicates that allowed for symmetrical adjustments across multiple parts with ease. Max achieved a realistic, weathered look using a Polyhaven rust material, applied via cube projection and scaled appropriately. An interesting technique he explored for roughness and base color involved using grunge images from stock photo websites like Pexels. By plugging these images directly into the roughness input and then refining them with a color ramp, he gained precise control over reflectivity, adding a unique and organic touch to the surfaces.
Crafting the Mood: Lighting and Atmospheric Effects
To truly sell the underground mood, lighting and atmospheric effects were paramount. An area light was introduced and meticulously adjusted for brightness. A mesh cube, set to ‘bounds’ display, became the vessel for atmospheric haze, utilizing a volume scatter material with a density of 0.01 and adjusted anisotropy. To emphasize these volumetric effects, the default world background lighting was completely removed. While a spotlight was considered, an HDRI from Polyhaven (an overcast sky) ultimately served as the environmental light source, effectively acting as the ‘roof’ light, casting diffused and natural-looking illumination throughout the scene.
Populating the Scene: Integrating Industrial Assets
To inject complexity and rich detail, pre-made industrial assets were integrated. A large industrial structure, previously modeled by Max, was ingeniously adapted using a Simple Deform modifier set to ‘bend’ along the Z-axis. To ensure correct bending, the object was rotated 90 degrees, its rotation applied, and ‘on cage’ mode enabled for accurate deformation previews. Crucially, loop cuts were added to pipes within the asset to prevent distortion during bending. An array modifier, placed before the simple deform, created multiple instances around the cylinder, with the bend angle precisely adjusted to 360 degrees. Additional pipes from a separate free pack were incorporated, strategically placed, scaled, and textured with the same rust material, unifying the scene’s aesthetic.
Refining the View: Camera Composition and Post-Processing
The camera composition underwent several iterations to maximize visual interest. Max duplicated his camera, using Control+Numpad 0 to switch active cameras, allowing for free experimentation without losing previous angles. A low-angle, upward-looking perspective was favored, effectively emphasizing silhouetted foreground elements and creating compelling leading lines with duplicated stair sections (flipped with SXX -1). Additional platforms and crossing structures, some with a concrete material and bevels, were introduced to break up the space and add visual weight. Support structures and more pipe details were scattered throughout the scene, enhancing visual depth. After rendering the final image, it was taken into Photoshop for essential post-processing and editing, bringing out the final dramatic flair.
Max Hay’s workflow provides a fantastic blueprint for anyone looking to create detailed and atmospheric environments in Blender. His commitment to sharing resources, including free asset packs and the blend file for this project, is a testament to his passion for empowering other artists. If you’re eager to expand your skills further, he also offers a Cyber Environments Course on his website, providing an even deeper dive into his techniques.
Ready to build your own stunning scenes? Explore more Blender 3D Modeling tutorials and discover advanced texturing and shading techniques on CGEcho.net. For additional inspiration and guides on creating captivating visuals, be sure to check out our Blender Lighting & Rendering section.


