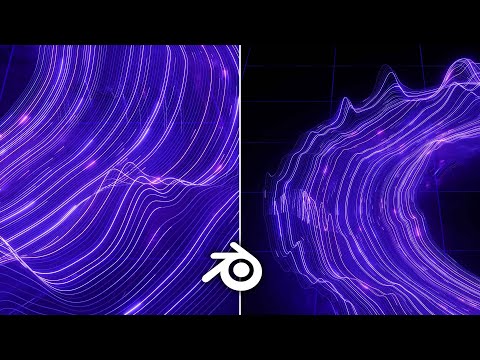
Uncover the secrets to creating stunning light trails in Blender 4.5 with Geometry Nodes. This tutorial from Ducky 3D reveals how to craft dynamic, animated topographic map-inspired effects, perfect for motion graphics.
Are you eager to elevate your Blender projects with captivating visual effects? Many artists find themselves searching for innovative ways to add dynamic flair to their scenes. Look no further! In a brilliant tutorial, the renowned 3D artist Ducky 3D (also known as Chris P.) guides creators through the intricate yet rewarding process of generating beautiful light trails in Blender 4.5 using Geometry Nodes. Known for his accessible and high-quality tutorials, he consistently empowers Blender users to push their creative boundaries, transforming complex ideas into achievable visual spectacles.
This tutorial is a masterclass in combining curves and Blender’s advanced shading system to produce a visually stunning effect reminiscent of a dynamic, topographic map. It’s a powerful motion graphics technique that offers immense versatility for your original artwork.
The journey begins in Geometry Nodes, where Ducky 3D sets up a circular array of curves. He starts with a curve circle, setting its resolution to 300, and then feeds this into a simulation zone. Inside this zone, a transform geometry node scales each new instance by a precise 1.005, while a join geometry node merges these duplicates to form the array. This entire arrangement is then baked for stability, creating the foundational structure for the light trails.
Next, the curves are artfully displaced and shaped into undulating hills. A set position node, combined with a noise texture plugged into the Z-axis via a combine XYZ node, normalizes the displacement. A vector math node, set to scale (e.g., 2.3), fine-tunes the strength of these formations. To achieve the characteristic flat portions with nuanced transitions, the creator opts for an RGB curves node over a traditional color ramp, allowing for more precise control to flatten sections while retaining subtle waves.
For texturing and animation, a set material node assigns a new emission material, aptly named “light.” Before this, a curve to mesh node, utilizing another curve circle (resolution 3, radius 0.001), gives the ethereal curves their necessary thickness. In the shader editor, an emission shader is paired with a wave texture and a color ramp. To ensure the wave texture correctly aligns with the curve direction and introduces randomness, Ducky 3D stores two crucial attributes just before the set position node: a spline parameter (named ‘S’) for the factor, and a random value (named ‘R’) set to ‘splines’ for unique values per curve. In the shader, an attribute node for ‘S’ plugs its factor into the wave texture’s vector, ensuring the wave respects the curve’s direction. The wave texture is set to ‘saw’ for distinct hard and faded edges. The ‘R’ attribute’s factor is plugged into the wave texture’s phase offset, then passed through a math node set to ‘multiply add’ to control the dramatic randomness and overall animation. The color ramp is adjusted to create a bright tip fading into darker shades, and a mix color node offers an easy way to change the overall hue. Compositing is further enhanced with a glare node set to ‘fog glow’ for a captivating visual effect, all rendered efficiently in Eevee.
To introduce further dynamism, the curves are separated, allowing for varied animation speeds and material properties. After the set position node, a separate geometry node is used to separate splines based on a random boolean value (e.g., 0.5), effectively splitting the curves into two distinct groups. These groups are then re-joined. By duplicating the material (e.g., “light” and “light two”) and assigning each to a separated group, individual properties like brightness and animation speed can be controlled independently. Animation is achieved by keyframing the ‘add’ value of the multiply add node in the shader editor. For a seamless loop over 400 frames, the value is set to 0 at frame 0 and to -10 * pi (for one material) and -4 * pi (for the second material) at the end frame, resulting in beautifully synchronized yet distinct animation speeds.
Finally, a grid floor is added using a mesh plane with a new material featuring an emission shader, a color ramp, and a Voronoi texture (Chvby Chev pattern) for the grid effect. The camera is set up for a desirable angle, and the animation is rendered in Eevee, with options for outputting to PNG sequences or FFmpeg video (MP4/QuickTime) at desired resolutions.
For those looking to dive even deeper, Ducky 3D offers additional advanced training and project files through his Patreon. While specific tier pricing isn’t detailed here, Patreon typically offers various subscription levels, providing anything from early access to exclusive content, project files, and direct support, often starting from just a few dollars a month. This is a fantastic way to support his work and accelerate your learning!
By following these steps, you can create stunning, dynamic light trails that bring your Blender scenes to life. This powerful technique, expertly demonstrated by Ducky 3D, opens up a world of possibilities for unique motion graphics and artistic expression. Experiment with different parameters and colors to truly make these effects your own.
Ready to explore more advanced techniques in Blender? Discover additional tutorials and inspiration for creating dynamic visuals in our comprehensive Blender VFX & Simulation section. You can also deepen your understanding of visual aesthetics by checking out our articles on Blender Texturing & Shading, or browse our full Blender category for a wealth of resources.


