Learn how to build a dynamic star rating component in Rive using state machines and data binding. This guide, presented by Rive, makes interactive graphics accessible, even for beginners, and allows for seamless integration into your projects.
Creating engaging user interfaces often involves dynamic elements that respond to user input. A common and highly useful component is the star rating, allowing users to provide feedback interactively. If you’re looking to implement such a feature with stunning visuals and smooth transitions, Rive offers a powerful, free-to-use platform for individuals to design and develop interactive, production-ready graphics.
In a recent tutorial, the team at Rive walks us through the process of setting up a versatile star rating component using their state machine and data binding capabilities. This comprehensive guide simplifies what might seem like a complex task, breaking it down into manageable steps that anyone can follow to bring their designs to life.
Getting Started with Your Rive Project
The journey begins by accessing the provided project file, available on Rive’s marketplace page. You simply need to click the “star rating” link and select “remix” to copy it into your workspace. Once opened in the Rive editor, ensure you navigate from the default “complete artboard” to the “tutorial artboard,” which provides a blank canvas for your state machine. Remember to switch to animate mode if the state machine isn’t immediately visible, as this is where the magic happens.
Building the State Machine Logic
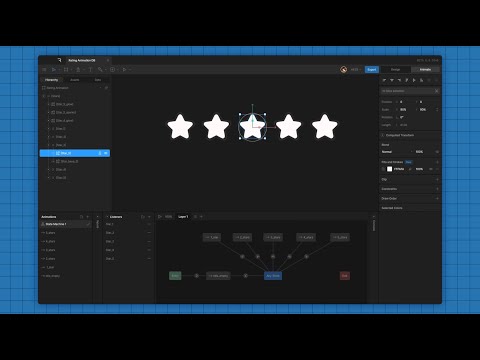
The tutorial artboard comes equipped with six distinct animations: an empty state, and states for one, two, three, four, and five stars. These six animation states are the building blocks for your interactive component and must be dragged onto the state machine stage. To facilitate smooth transitions between any of these states, an “Any State” node is crucial. From this “Any State,” you’ll draw transitions to each of your six star rating animations.
Implementing Data Binding with a View Model
The core mechanism for triggering these transitions is a condition based on a numerical value. To manage this, a new View Model is created from the tutorial artboard’s properties panel. This view model, aptly named “tutorial view model,” will house a number property called “numbum.” This single number property will serve as the dynamic condition for all your state transitions. Each of the six transitions from the “Any State” is then assigned a condition: “if num is equal to X,” where X corresponds to the desired star rating (0 for empty, 1 for one star, and so on, up to 5). Initially, “numbum” is zero, placing the component in its empty state; manually adjusting this value will demonstrate the transitions.
Enabling User Interaction with Listeners
To make the component truly interactive, listeners are implemented to respond to mouse clicks. Five listeners are created, one for each star. For each listener, a “target layer” is set by selecting the corresponding star (e.g., “star one” for listener one) from the hierarchy panel. The action for each listener is configured such that “if the pointer clicks down on [star X],” the “numbum” property in the view model is set to X. This elegant setup allows users to change the star rating simply by clicking a star, which in turn updates the view model number, controls the state machine conditions, and animates the correct star rating. Rive’s approach to interactive graphics, where design logic meets real-time functionality, truly sets it apart.
Once completed, your interactive star rating component is fully usable and can be exported as a .RIV file. This file can then be seamlessly integrated into various platforms, including web pages, mobile applications, or game engines, thanks to Rive’s extensive documentation and runtime libraries. This makes Rive an excellent choice for designers and developers looking to add sophisticated interactive elements to their projects without deep coding knowledge.
Sources:
How to Create a Star Rating Component in Rive – Rive


