Feeling overwhelmed by 3D asset creation? This guide breaks down the entire professional pipeline, from initial concept to game engine integration, offering a clear, repeatable workflow for artists of all levels.
Creating stunning 3D assets for games can seem like an insurmountable challenge, a complex maze of software and techniques. Many aspiring artists find themselves bogged down in tutorials, losing sight of the bigger picture. However, the process is far more streamlined and logical than it appears. Once you grasp the fundamental workflow, you can apply it to virtually any asset you wish to create.
Enter 3dEx, a seasoned expert in the field, who generously shares his insights into the full asset creation pipeline in a comprehensive video guide. He demystifies the journey from a raw idea to a polished, game-ready model, demonstrating how each stage contributes to the final masterpiece. His approach emphasizes understanding the overarching process rather than getting lost in step-by-step minutiae, providing a crucial foundation for both beginners and experienced artists looking to refine their methods.
The Foundational Steps of Asset Creation
Every professional 3D asset begins not with software, but with an idea. The initial phase involves extensive reference gathering and planning. This crucial step helps define the asset’s shape language, proportions, and material properties before a single polygon is laid down. Think of it as sketching out your blueprint; a solid plan prevents costly revisions later.
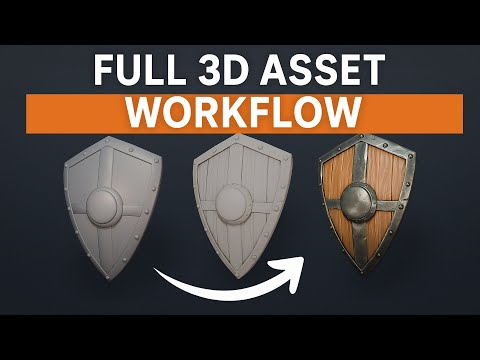
Next comes the blockout and base mesh creation. Here, artists construct the asset using basic geometric shapes, focusing purely on scale, silhouette, and overall proportions. This stage is swift and iterative, allowing for quick adjustments to the model’s fundamental form. Once the blockout establishes a strong foundation, the excitement truly begins with high poly sculpting and detailing. This is where the model gains its intricate details, fine bevels, and organic surface textures. Tools like ZBrush or Blender’s sculpting mode are indispensable here, allowing for unparalleled artistic freedom without worrying about polygon counts.
Optimizing for Performance and Realism
While a high poly model looks fantastic, it’s typically far too dense for real-time game engines. This brings us to retopology, the art of creating a clean, optimized low poly mesh that perfectly captures the shape and silhouette of its high poly counterpart. This balance between visual fidelity and performance is key to creating game-ready assets. The artist also highlights an alternative method: creating the low poly first, then adding high poly details, which can sometimes streamline the process for specific assets.
Following retopology is UV unwrapping, essentially flattening the 3D model into a 2D space so textures can be applied efficiently. Clean UVs are paramount for seamless texturing and avoiding distortions. Once unwrapped, the high poly details are transferred to the low poly model through a process called baking. This generates texture maps like normal maps and ambient occlusion, allowing the low poly mesh to appear incredibly detailed without the performance hit of millions of polygons.
Bringing Assets to Life with Textures and Engine Integration
The fun truly begins with texturing. Using software like Substance Painter, artists paint materials, add color variations, and simulate wear and tear. Textures are critical; they tell the asset’s story and sell its realism, making the model truly come alive. After texturing, everything is exported and imported into the chosen game engine, such as Unreal Engine or Unity. Here, materials are set up, roughness and metallic values are tweaked, and the asset is tested under various lighting conditions to ensure it looks perfect within the game world.
The final stage is polish. This involves minor adjustments to textures, fixing any shading issues, and potentially adding post-processing effects. For portfolio pieces, a turntable render or beauty shot is often created to showcase the asset’s best angles. This comprehensive workflow, from concept to final engine presentation, builds upon each preceding stage, ensuring a cohesive and professional result.
Enhance Your Workflow with 3dEx’s Tools
For artists looking to further enhance their workflow, 3dEx offers valuable resources. He has developed a Stylized Blender Brush Pack and 3DEX Stylized Smart Materials 3.0, available for purchase on Gumroad. While these tools are paid, they are designed to integrate seamlessly into a professional artist’s toolkit, offering specialized brushes and materials that can significantly speed up the texturing and sculpting phases, particularly for stylized art. The video itself, however, remains a free and invaluable resource for understanding the entire pipeline.
Understanding this end-to-end process is empowering. It transforms what might seem like a daunting task into a series of manageable, logical steps. Whether you’re just starting your 3D journey or aiming to refine your existing skills, this workflow guide provides the clarity needed to create high-quality, game-ready assets with confidence. For more great insights into bringing your digital creations to life, explore our extensive Blender 3D Modeling section. You can also dive into advanced techniques for Texturing & Shading in Blender, or learn how to integrate your assets into immersive environments with our Unreal Engine Environment & World Building guides.

")

