This comprehensive guide from Extra 3d demystifies Blender’s procedural materials, empowering beginners to craft stunning textures. Learn to create wood, plastic, and snow, mastering the Shader Editor’s powerful node-based workflow for realistic renders.
Are you ready to transform your Blender renders with incredible detail and realism? The world of procedural materials offers endless possibilities, allowing artists to generate complex textures without relying on external image files. This approach not only provides infinite resolution but also keeps your project files lean and manageable. Today, we delve into an insightful tutorial by Alan Wayne, better known as 3D artist and educator Extra 3d, who guides us through mastering the fundamentals of procedural shading in Blender.
Extra 3d is renowned for his clear, concise, and highly practical Blender tutorials, consistently helping artists elevate their craft. In this particular video, he makes the often-intimidating Shader Editor accessible, walking you through the essential techniques to create three distinct and impressive materials: wood, plastic, and snow. He assumes you have basic Blender knowledge, emphasizing the crucial step of enabling the Node Wrangler add-on – a true game-changer for efficient node previewing (just Ctrl+Shift+Click on any node!).
Understanding the Shader Editor’s Core
Your journey begins in the Shader Editor, where you’ll find the default Principled BSDF shader connected to a Material Output node. The Principled BSDF is a versatile powerhouse, combining most essential shader properties like color, roughness, and metallic values. Alan shows you how to add new nodes with Shift+A, introducing the Noise Texture node – a fundamental tool for generating random patterns. You can control these patterns with settings like Scale, Detail (for edge sharpness), and Roughness (for a dirt-like effect). The 4D type introduces a ‘W’ value, which acts as a seed to vary the pattern, offering endless unique iterations. To enhance a texture’s contrast, he demonstrates using a Color Ramp node, adjusting its handles towards the center for a punchier look.
Conquering Texture Mapping Challenges
A common hurdle with procedural textures is stretching. This occurs because Blender often defaults to generated texture coordinates based on mesh vertex data. The solution? Employing a Texture Coordinate node and connecting its ‘Object’ output to your texture. It’s crucial to remember to apply the scale of your model (Ctrl+A) for accurate results. To further manipulate textures, a Mapping node can be inserted after the Texture Coordinate node, providing control over location, rotation, and scale, allowing you to transform multiple textures uniformly. Extra 3d highlights that the ‘Factor’ output of textures is frequently used as it provides a convenient black and white value, perfect for masks.
Mixing Textures and Shaders for Complexity
To combine textures, the Mix Color node is your go-to. It blends two textures, with its ‘Factor’ input determining the blend ratio: 0 prioritizes the first texture (black), and 1 prioritizes the second (white). The node also offers modes like ‘Add’ or ‘Multiply’ for different blending effects. For mixing entire shaders, such as two Principled BSDF nodes, you’ll use a Mix Shader node. Its ‘Factor’ input also works on a 0-1 scale and can be powerfully driven by texture masks.
Crafting Realistic Materials: Wood, Plastic, and Snow
The tutorial then dives into practical application, demonstrating how to build specific materials step-by-step:
- Procedural Wood: You’ll learn to set up a Noise Texture with mapping and object coordinates, crunching a Color Ramp for intricate detail. Increasing the Noise Texture’s detail and roughness, along with adding distortion, beautifully mimics wood grain. The Mapping node’s scale is used to stretch the texture. Dark and light brown colors are applied to the base color, and roughness is controlled by connecting the base color’s output, via another Color Ramp, to the Principled BSDF’s roughness input, allowing specific parts of the wood to be glossier or rougher.
- Plastic Toy Material: Start with a vibrant yellow Principled BSDF. Small surface details are added using a high-scale Noise Texture. To translate this black and white texture into actual surface detail without altering geometry, a Bump Map node comes into play. The noise texture connects to the ‘Height’ input, and the Bump Map’s ‘Normal’ output connects to the Principled BSDF’s ‘Normal’ input, with adjustable strength. To add a layer of dirt, a duplicate (dark-colored) Principled BSDF is mixed with the clean one using a Mix Shader. A dirt mask is created from another Noise Texture, controlled by a Color Ramp, and plugged into the Mix Shader’s ‘Factor’.
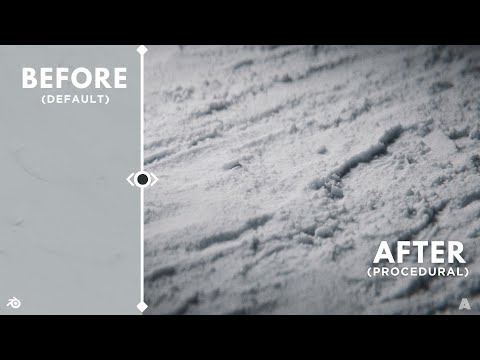
- Snow Material: A Mix Color node combines light blue and white for subtle variations, controlled by a Voronoi Texture with a high scale and increased details. This Voronoi output also drives a Bump Map for base surface details. To achieve even more intricate layering, a second Bump Map is added, connecting its ‘Normal’ input to the first Bump Map’s ‘Normal’ output. This allows a new texture (like another Noise Texture with specific scale and maximum details) to add subtle effects. An additional Voronoi texture with a large scale can be used to create crack-like patterns via its color output, and snow roughness is typically set low, around 0.1.
Advanced Techniques: Subsurface Scattering and Displacement
Alan Wayne doesn’t stop there. He also introduces Subsurface Scattering, a crucial property for materials like skin or wax, allowing light to pass through the mesh. Its ‘Weight’ controls strength, and an RGB node connected to the ‘Radius’ input offers precise control over the scattered light’s color. Finally, he covers Displacement, which creates actual geometric deformation. This requires the mesh to have sufficient geometry (often achieved with a Subdivision Surface modifier). A texture (like Noise Texture) connects to the ‘Displacement’ input of the Material Output. For displacement to render correctly, the material settings must be changed from ‘Bump Only’ to ‘Displacement and Bump‘, with adjustable strength.
Accessing Project Files and More
Extra 3d generously provides a free starter file to help you begin your procedural journey. For those looking to dive deeper and support his work, he offers project files for the snow animation, wood animation, and all three materials covered in the tutorial on his Patreon. You can also connect with him and see more of his incredible work on Instagram and his website.
This tutorial is a fantastic resource for anyone looking to master procedural materials in Blender. Extra 3d’s clear explanations and practical demonstrations make complex concepts easy to grasp, empowering you to create stunning, dynamic textures for your 3D projects. Take these techniques, experiment, and watch your renders come to life!
To continue enhancing your Blender skills, don’t miss our extensive collection of Blender Texturing & Shading guides. You might also find inspiration in our Blender Lighting & Rendering section to perfect your scene presentation. For all things Blender, explore our main Blender category for more tutorials and insights.


